· 8 min
5 Steps for Setting up a Home Gym
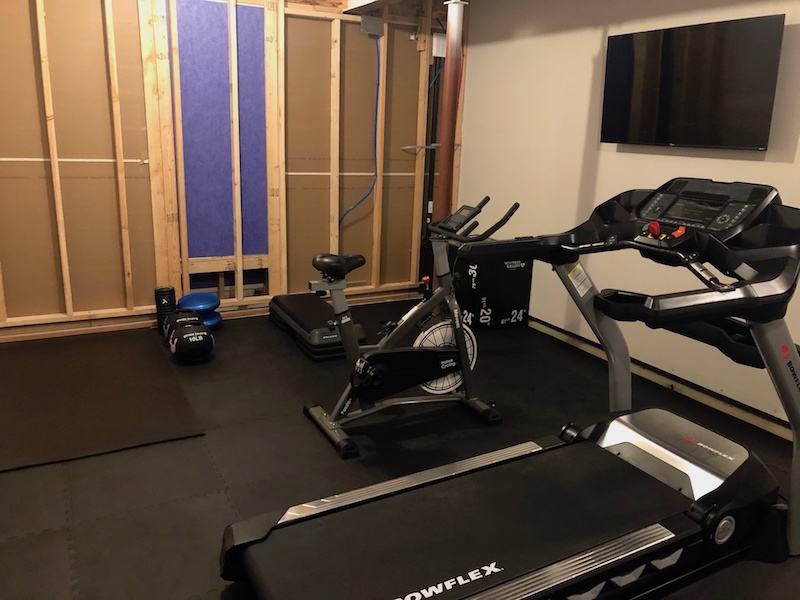
According to the Centers for Disease Control and Prevention (CDC), some of the most common barriers to regular physical activity are lack of time, lack of motivation and weather conditions. These are barriers that everyone has encountered at one point or another when trying to establish a regular exercise routine, and finding a solution is easier said than done! After having my first baby, ending my soccer career after tearing my ACL (for the fourth time!), moving to Colorado (a state that has cooler weather for half of the year), and facing the new challenges associated with coronavirus, I was determined to establish a workout routine that meshed well with my lifestyle. I am happy to report I have found a routine that is efficient, fun and keeps me in shape! The key to this routine is simple: create a home gym. It sounds intimidating and expensive, but it doesn’t have to be either! In this post I will outline 5 steps for bringing the gym to your living space. How to Create a Home Gym Step #1: Identify Where You Plan to do Your Workouts The first step to creating a home gym is identifying your space. This can be the most limiting factor, so you want to do this first. Maybe you have a lot of available space, and maybe you live in a shoebox in San Francisco! Think about the types of exercises you want to be able to do and where you have the proper space to do those activities. Note: You may have to get creative and modify your activities based on space available. Fortunately for me, I had 800 sq ft of basement storage space that was only partially being used. My husband and I decided to section off 300 sq ft for storage and use the remaining 500 sq ft of empty, concrete space to build out our home gym. Step #2: Decide What Types of Exercises you Want to do and the Equipment Needed In order to decide what exercises you plan to do, it’s a good idea to outline your exercise goals – a step within a step! The home exercises you identify should be aligned with your workout goals, and they will vary significantly from individual to individual. My main workout goals, for example, are to maintain my cardiovascular fitness with middle-distance interval training (2x per week), build/tone my muscles (3x per week) and have fun. Based on my goals, I identified running, biking, weightlifting and freeweight/bodyweight (circuit-style) exercises as workout activities I wanted to be able to do from home. With that in mind, I came up with a list of exercise equipment that would enable me to do my desired workout activities in my home: a treadmill, a spin bike, a lifting machine (e.g., Bowflex, folding squat rack), free weights, a suspension band, an aerobic stepper, medicine balls, and a stability disc/ball. Nearly all of my workout goals can be achieved using this lifting cage and free weights, and it doesn’t take up too much space! Though I did have to be willing to pay for it. Your home gym doesn’t need to have as much equipment as mine. For example, you may not need both a spin bike and a treadmill, and free weights may be all you need (so no lifting machine) – it all comes down to what you want and what you can work into your space. Step #3: Get the Equipment You Need Before you grab your phone and start tapping the “Buy Now” button on Amazon, determine a budget for getting your home gym started. Once you have a general budget in mind, you can start prioritizing what equipment you want to get first based on factors like price, size and what is most important for helping you achieve your fitness goals. My first purchases were a treadmill and an exercise bike since I heavily prioritize my cardiovascular fitness and sometimes I need to switch between high impact and low impact exercises to give my knee a break. I was able to get a very lightly used Bowflex BXT216 Treadmill on Offer Up for $500 (I won’t mention that I had to rent a U-Haul truck and drive through snowy roads to pick it up!). I purchased MEVEM Indoor Cycling Bike, since I only wanted a basic bike that had a display monitor and could “do the job.” I love being able to model healthy behavior for my son! The next purchase was a TRX Home2 System. I had not done any weightlifting in a long time and I wanted to progress back into it, so I figured a TRX band would be great. The suspension band can be used anywhere, doesn’t take up much space, and it utilizes body weight to give the user a total-body workout. It proved to be an excellent way for me to progress back into weightlifting. The moment you begin researching weightlifting equipment, you’ll notice some of the machines are very expensive and there are endless machines that serve different purposes. My husband and I spent multiple weeks looking at different options, mostly the more all-inclusive options to save on space. We started looking at the Bowflex Xtreme 2 SE Home Gym, but then we decided we wanted to be able to do more than resistance training. Next we had our eyes on a PRO Squat Rack with Kipping Bar and other add ons because it would help conserve space yet provide the flexibility to do cross-functional fitness exercises, Olympic Weights, MMA etc. The PRO Squat Rack and other add ons ended up being on backorder, and it still didn’t seem like the one-stop-shop we were looking for. My husband and I the night we had our fully-loaded Tuff Stuff Smith Machine Half Cage Ensemble installed. We were so excited to get in our first workout in our home gym! Alas, we decided to take a trip to a fitness warehouse where we could get a more comprehensive idea of the gamut of fitness equipment and speak with people who know fitness equipment. If you’ve never done this, I highly recommend it! My husband and I made a trip to the Fitness Gallery (a.k.a. Disneyland of fitness equipment) in Denver, CO. We left with a big hit to our bank account, but we ended up getting equipment (i.e., TuffStuff Smith Machine Half Cage Ensemble with all the add ons, Aerobics Stepper, Bosu ball, Medicine Balls, and free weights 5-25 pounds) that will help us maintain our health for years to come. As mentioned, the equipment you get will depend on a variety of factors, but I recommend you spend time doing your research! Step #4: Build the Gym! The “If You Build It, They Will Come” line from the Field of Dreams movie actually applied in this case. Though it took a number of weeks before we had a usable gym. In addition to getting all the exercise equipment, we had to buy cases and cases of ½ EVA Foam Interlocking Tiles to put on top of the concrete surface of our designated gym area. In certain areas my husband used a circular saw and some cardboard boxes to cut the tiles so they would fit tightly against the walls. The interval training side of our gym! Note: the TV is always on during treadmill runs and biking workouts. Earlier I mentioned having fun as being one of my exercise goals. To make exercise more enjoyable, I like distracting myself by watching TV with subtitles and listening to good music. We found a 43” Roku TV and a SANUS Full-Motion TV Mount at a very affordable price from Costco. To get the beats bumping in the gym, we installed Polk speakers and play music through our 7-channel receiver. Of course RockMyRun is our music app of choice! A nice-to-have we added is a divider curtain to section off our storage space from our gym. Step #5: Come up with a Program and Stick to It. Change it up When it Makes Sense! It has been three months since my husband and I set up our home gym, and we have been consistently using the gym 3-4 times per week. How did we create this habit, you ask? We designed an A-B-A lifting program based on this core program with some additional exercises added, printed out workout log sheets, and we have stuck to it! One of the biggest motivators has been being able to visualize our progress week over week. We also add new exercises and swap out exercises from time-to-time, plus alternate our strength days with cardio days. Two tips I highly recommend! Hers and his workout logs. Yes, we intentionally bought pens that matched our clipboards! Hopefully these tips have given you some ideas about how you can incorporate workouts into your living space to help you combat some of the most common barriers to physical activity. If you have a gym in your home, you have no excuse for not working out! You can’t say you don’t have time or it’s too cold outside. Remember, it doesn’t matter if you live in a small apartment with a minimal budget or a palace with no budget, you can still get creative and design something that works for you! About the Author Katie Addison is the Chief Operating Officer for Rock My World, Inc. and oversees the RockMyRun product. She lives a very active lifestyle, having played soccer since she was six. Due to experiencing multiple ACL tears while playing college soccer at Stanford University and Florida State University, Katie has had to modify some of her exercise activities. Katie, her husband, and her 1-yr-old son enjoy hikes in the scenic Denver area along with bumping RockMyRun beats while they work out in their home gym.
· 1 min
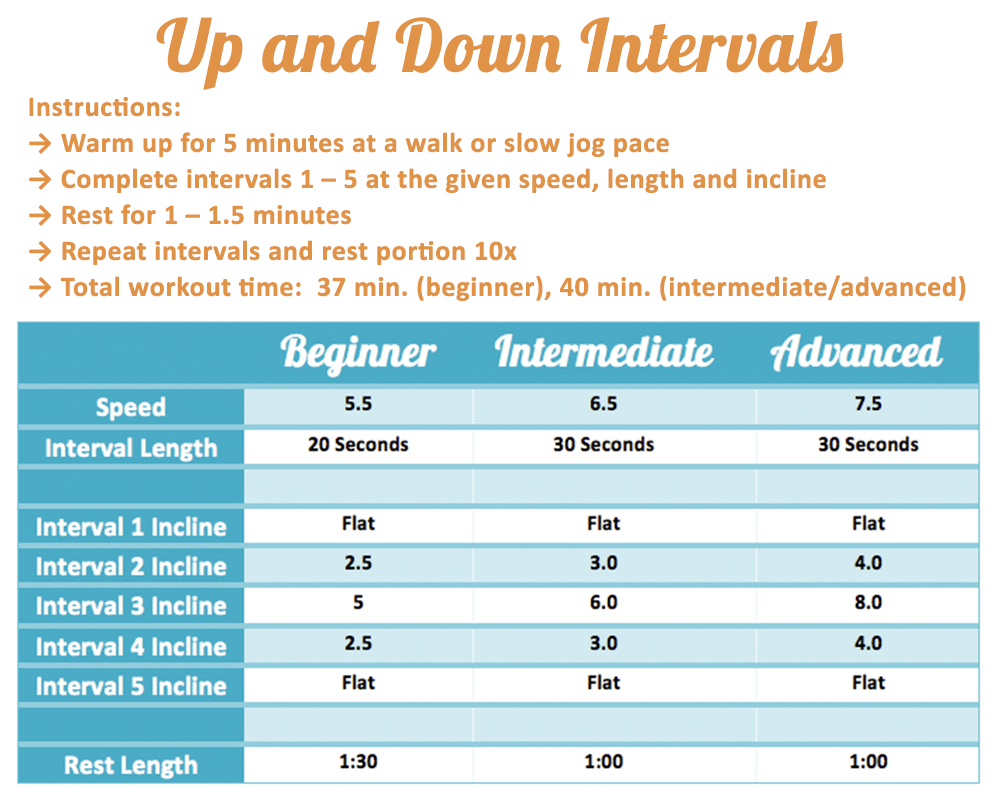
Wednesday Workout: Up and Down Intervals
Amp up the intensity of your next workout with some inclines! This “Up and Down Intervals” treadmill workout will have your legs burning and heart pumping with perfectly placed inclines and intervals. Checkout the workout – and some suggested RockMyRun mix pairings – below to get started! Beginner workout mix suggestion: Gonna Make You Sweat Intermediate workout mix suggestion: Fast Times Advanced workout mix suggestion: Forward Motion Workout contributed by Brock Jones. Brock is Co-Owner and Head Trainer with in Lexington, KY. He holds a Masters of Science in Exercise Physiology from the University of Kentucky and is an NSCA Certified Strength and Conditioning Specialist. You can read more of Brock’s posts about fitness and exercise on the .
· 1 min
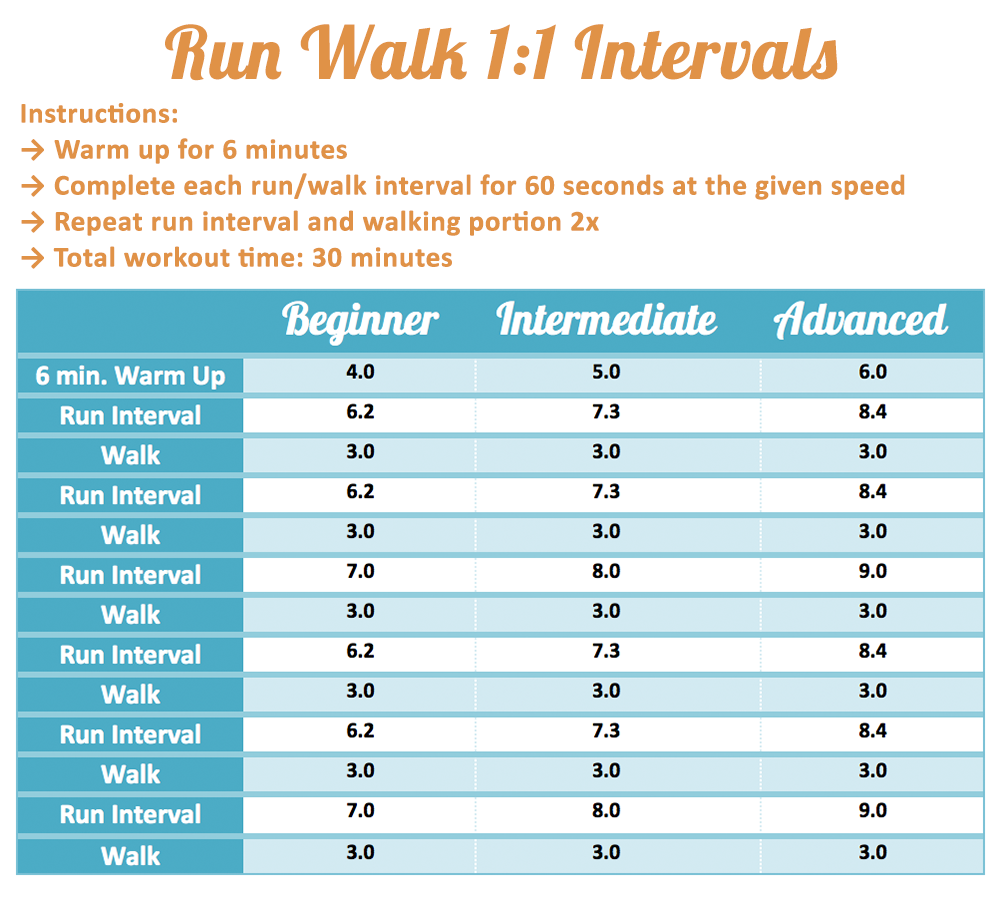
Wednesday Workout: Run Walk Intervals
Only have 30 minutes to get in a rockin’ cardio workout? Grab your shoes and head to the gym to try this ‘Run Walk 1:1 Intervals’ workout! Checkout the workout – and some suggested RockMyRun mix pairings – below to get started! Beginner workout mix suggestion: Feel The Magic Intermediate workout mix suggestion: Shake It Off Advanced workout mix suggestion: Fired Up Workout contributed by Brock Jones. Brock is Co-Owner and Head Trainer with in Lexington, KY. He holds a Masters of Science in Exercise Physiology from the University of Kentucky and is an NSCA Certified Strength and Conditioning Specialist. You can read more of Brock’s posts about fitness and exercise on the .
· 1 min
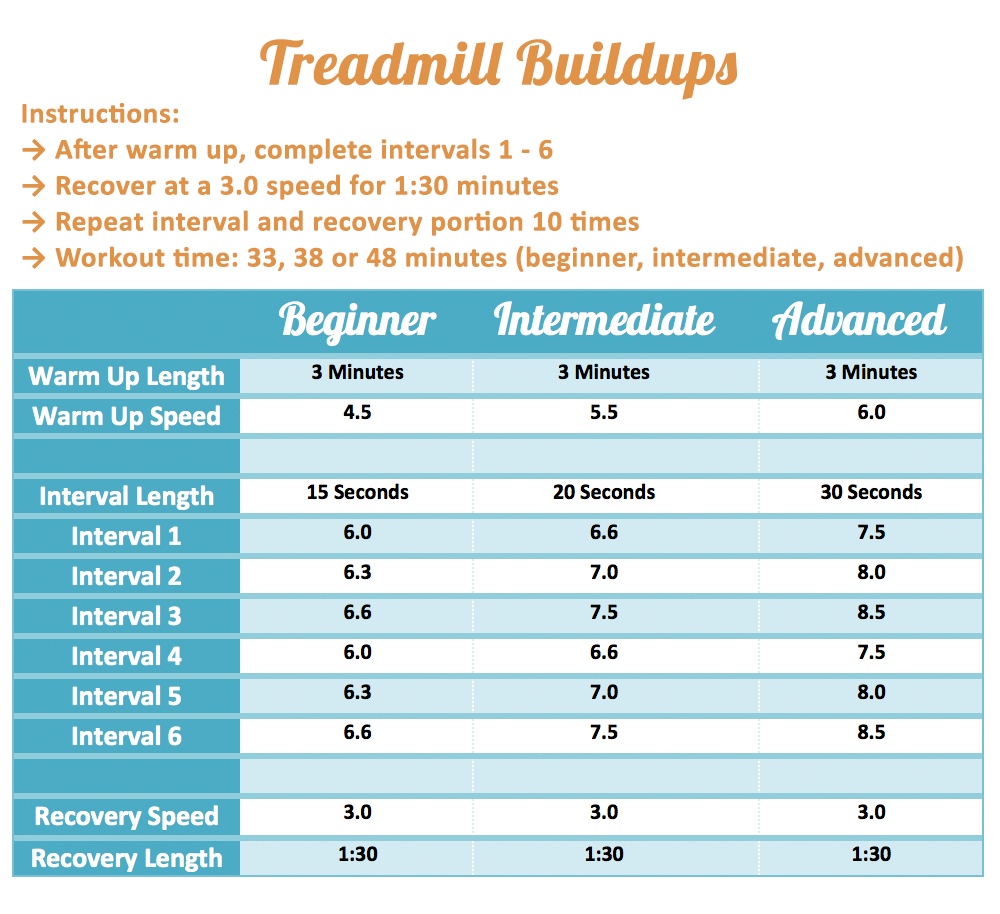
Wednesday Workout: Treadmill Buildups
Have a need for speed? Test out this ‘Treadmill Buildups’ workout for a rockin’ winter workout that pushes the pace and gets you moving! Checkout the workout – and some suggested RockMyRun mix pairings – below to get started! Beginner workout mix suggestion: Sweet Summer Sweat Intermediate workout mix suggestion: Rock It Science Advanced workout mix suggestion: Feel The Burn Workout contributed by Brock Jones. Brock is Co-Owner and Head Trainer with in Lexington, KY. He holds a Masters of Science in Exercise Physiology from the University of Kentucky and is an NSCA Certified Strength and Conditioning Specialist. You can read more of Brock’s posts about fitness and exercise on the .

· 3 min
Train Less. Perform Better.
A lot of the more traditional approaches to cardio look at longer distances and higher volume as the best ways to get and stay in shape. While there is certainly nothing wrong with that method, I tend to take the “less is more” philosophy into my cardio training. This doesn’t mean I don’t lace up my running shoes as much as the next person; I simply have a much lower training volume than some people. I do this through High Intensity Interval Training (HIIT). HIIT is a type of cardio involving a specified period (generally short) of very hard activity followed by a short rest period. It’s a very effective training method, one that has helped my speed and endurance greatly over the past few years. Increased oxidative capacity. A muscle’s oxidative capacity is essentially its maximal ability to utilize oxygen in order to produce energy. It is a fancy term that basically says how much oxygen a muscle is capable of using at once. Research shows that runners can increase oxidative capacity, and thus overall endurance, in as little as two weeks of high intensity intervals.Prevent Boredom. If you’re like me, then a long distance run on the treadmill can get a little boring. Interval training not only requires you to change speed and intensity often, but also allows you the chance to get away from the treadmill altogether. Running tracks, public parks, and gymnasiums all provide a different environment to keep your training fun and interesting.Burn fat. Research agrees that the higher our exercise intensity, the more glucose we will burn during a workout. You might be asking: “Well, when does this ‘burn more fat’ come into play?” The answer is simple; at rest. Yes, while we are resting. In short, we lose a great amount of energy while burning glucose at high intensities. The thing most people do not realize is that we must replace this energy when we are done exercising. The fuel source for replacing energy?? You guessed it – FAT!! So, in essence, the more glucose we use during exercise, the more fat we burn following exercise!It’s challenging. Put down the magazine. Quit texting. The goal of interval training is to work as hard as you can the entire time. If you do that, you won’t be focusing on anything but your workout – which is the way it should be!Efficient. Interval training is efficient in terms of both time and injury prevention. Given that your intensity is at an appropriate level, you can get an effective interval workout done in less than 20 minutes. Because you’re putting in less time, you can avoid the constant pounding that miles and miles of distance running places upon the lower body. To give you guys a little idea of what a typical HIIT session looks like, I will leave you all with one of my favorite interval workouts. If you need some music for this workout, I’d recommend listening to “Go Hard” by DJ Prophecy. It’s an up-beat mix, which I prefer for interval training. Work-to-Rest Ratio – 2:1Sprint – 30 SecondsRest – 15 Seconds Round 1: 8 Total Sets – Sprint 30 seconds – rest 15 secondsRound 2: 6 Total Sets – Sprint 30 seconds – rest 15 secondsRound 3: 4 Total Sets – Sprint 30 seconds – rest 15 seconds It might take you a few sets to figure out what that speed is going to be if you’re on a treadmill, and that’s fine. Just make sure you are pushing yourself on each and every set in order to get the best results possible!! Have you tried high intensity interval training? If so, let me know what you think of it in the comments below. Post contributed by Brock Jones. Brock is Co-Owner and Head Trainer with in Lexington, KY. He holds a Masters of Science in Exercise Physiology from the University of Kentucky and is an NSCA Certified Strength and Conditioning Specialist. You can read more of Brock’s posts about fitness and exercise on the .
· 1 min
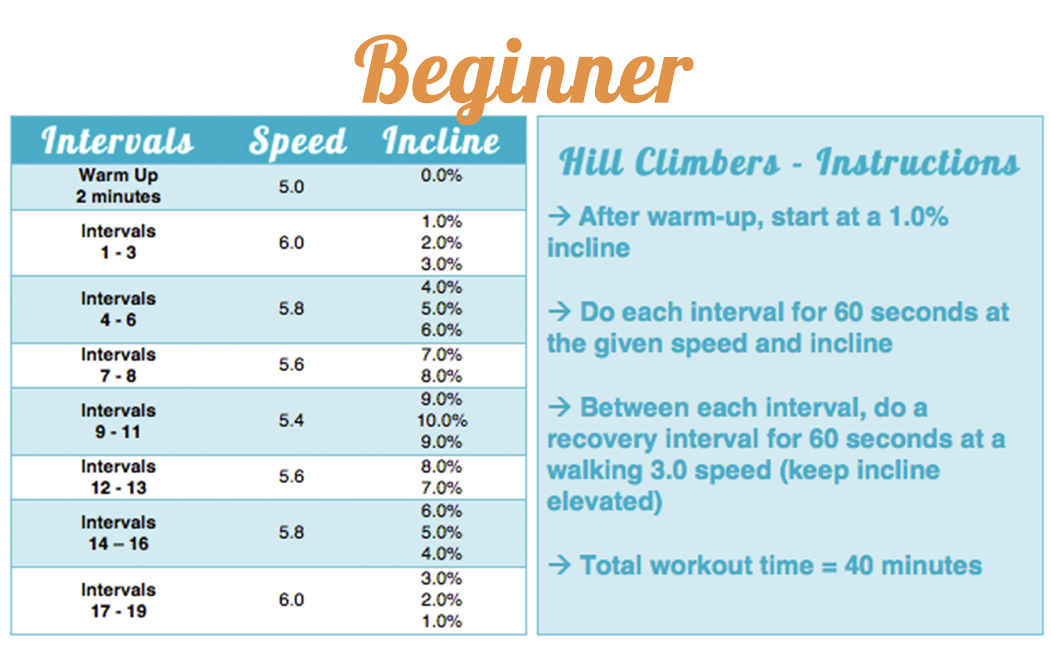
Wednesday Workout: Hill Climber Intervals
Looking for a killer treadmill workout? Test out this ‘Hill Climber Intervals’ workout and get ready to sweat! Involving the best of both worlds – intervals and inclines – this workout pairs nicely with some of our RockMyRun mixes! Beginner workout mix suggestion: Running On Sunshine Intermediate workout mix suggestion: Swift & Sweet Advanced workout mix suggestion: Adventure Run 2014 Workout contributed by Brock Jones. Brock is Co-Owner and Head Trainer with in Lexington, KY. He holds a Masters of Science in Exercise Physiology from the University of Kentucky and is an NSCA Certified Strength and Conditioning Specialist. You can read more of Brock’s posts about fitness and exercise on the .
· 2 min
Your Go-To Treadmill Workout This Fall: Incline Sprints
It’s that time of year again – the leaves start to change and the temperature starts to drop. While fall is beautiful, it means that soon cold weather will force us to kickoff treadmill season. For some, this is a welcomed change. For others, however, the ‘dreadmill’ is a last resort. Treadmills do however present us with benefits that road and trail running simply cannot. Here are four reasons to hop on a treadmill for your cardio this coming winter, as well as a killer treadmill workout to test out. Control. Treadmills allow you to control the speed and incline at which you’re running. Sure, you’re in control on the road, but with a treadmill you simply hit a button and it takes you where you want to be. There isn’t a guessing game as to what incline you’re running or how fast you’re going. I find this to be particularly helpful when I’m doing sprint or timed intervals. Efficient. The idea that every workout needs to be 90 minutes long is just wrong. If you work hard, you can get a great workout done in 30 minutes. Treadmills allow you to crank up speed and/or incline to levels that you probably wouldn’t hit out on the road. Variety. There are so many ways to change a workout using a treadmill. By altering your incline, speed or time intervals, you can come up with hundreds of workouts, all with their own unique settings. Some may think that treadmills are dull and repetitive, but with a little creativity, they are anything but boring. Weather. It’s always sunny and 75 on the treadmill. You don’t have to pack that extra pair of leggings when you’re running inside or need to worry about slipping on icy streets. This wouldn’t be much of a treadmill post if I didn’t also leave you with a solid workout to complete, would it? Well, you’re in luck. I’m leaving you with one of my favorite treadmill workouts. It targets both incline and speed, and keeps you changing things up to prevent boredom. *I use a Woodway treadmill that goes up to an incline of 25% and usually do 2 complete sets. With warmup and cooldown, it generally takes me almost exactly hour. Most treadmills will go up to 12-15% incline. If this is the case with you, I would recommend trying to do at least 2 sets. Also, if you’re pressed for time, you can also increase the speed, which will make it a MUCH more challenging workout. Post contributed by Brock Jones. Brock is Co-Owner and Head Trainer with in Lexington, KY. He holds a Masters of Science in Exercise Physiology from the University of Kentucky and is an NSCA Certified Strength and Conditioning Specialist. You can read more of Brock’s posts about fitness and exercise on the .
· 1 min
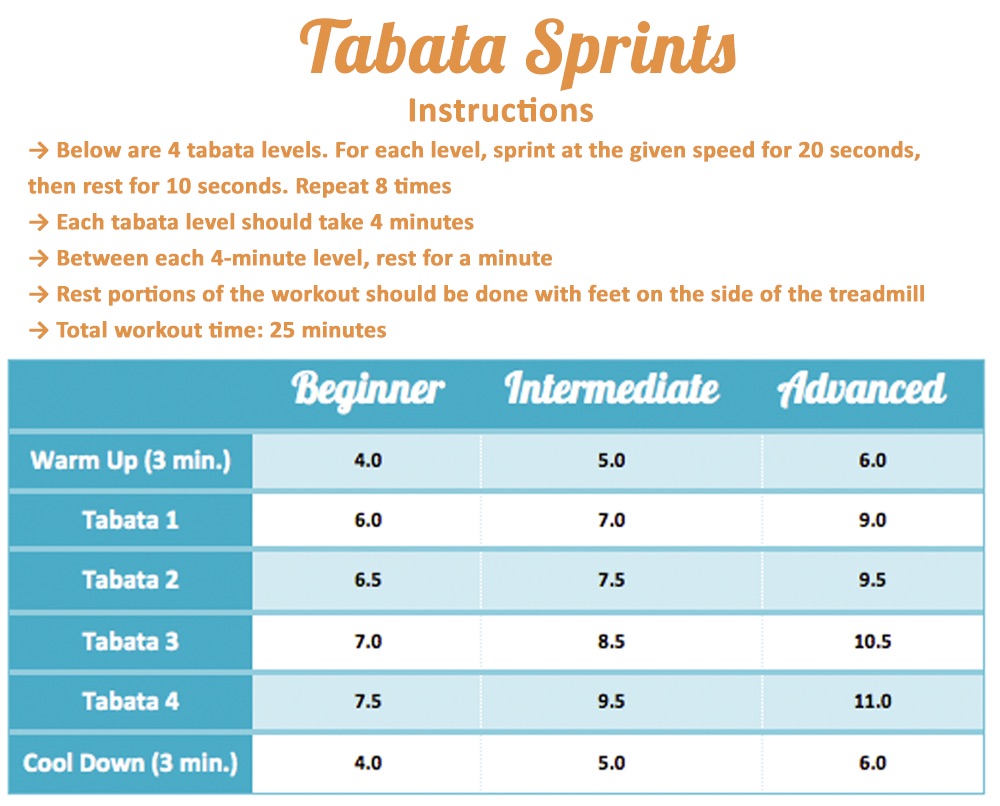
Get Fit With Tabata Sprints
Looking for a new treadmill routine? Test out “Tabata Sprints” for a fierce workout that will have you sweating buckets and burning calories! Checkout the workout – and some suggested RockMyRun mix pairings – below to get started! To get through this workout you’ll need some crazy beats, so check out the RockMyRun mixes Country Crazy and Super Twerk. Both mixes rock steady at 200 BPM, a high-energy tempo that will keep you moving even when the workout gets tough!

· 1 min
Wednesday Workout: Long Intervals
If you’re training for a half or full marathon, you may think you can ditch those pesky interval workouts—but intervals are actually just as important as your weekend long runs! Keep on reading for an interval workout that will help you practice running at your approximate race pace for an extended period of time and that can be done indoors. We’ve also included a trio of RockMyRun mix suggestions, so you’re bound to have a rockin’ workout. Whether you like country, rock or hip hop RockMyRun has a mix to match these intervals! Check out Summertime Country, Fired Up and Get Mad At It—all three are approximately 180 BPM, an ideal cadence to keep your feet moving swiftly and safely!

· 1 min
Wednesday Workout: Reverse Ladder
Winter weather forcing you to skip out on your beloved outdoor workouts? Don’t fret, simply keep on reading for a rockin’ treadmill workout called the Reverse Ladder (and some RockMyRun mix pairings!), that will have you feeling like you’re back outdoors! Need some music to go along with these workouts? Check out the RockMyRun mixes Momentum Gain and 80s Fun Run—both build in BPM overtime and this should match nicely as your workout builds in intensity!